Sync clerk users to your database using Webhooks: A Step-by-Step Guide

I try my best to teach technical web development concepts in an easier and more fun way.
Hey guys, If you've ever struggled with syncing user data stored on Clerk with your MongoDB database while using React (Vite) for your application, you're not alone. I had the same challenge, and after extensive research and trial and error, I managed to find a solution. In this article, I'll walk you through the process I used to sync Clerk users' data to my own database. Let's dive right in! 😉
PREQUESTITES
Before we begin, make sure you have the following:
MongoDB Account (you can use any database of your choice)
Fundamental knowledge of JavaScript (Node.js)
Basic understanding of MongoDB and Mongoose (Node.js)
Clerk typically stores user data on its servers by default. However, in certain situations, there may be a requirement to store this data in your own database. Consider an e-commerce website where you need to store user information, such as their name and email, along with their shopping cart, orders, wishlist/favorites, and more. Achieving this integration between Clerk and your own database can be accomplished using webhooks.
What are Webhooks?
Firstly, let's understand what webhooks are. A webhook is a way for one application to send data to another application as soon as a specific event occurs. These events can range from a customer making a purchase on an e-commerce site to new messages in a chat application or even changes in the weather forecast. Webhooks primarily rely on HTTP POST requests.
Steps to sync clerk users to your database
Here's a step-by-step guide to syncing users from Clerk to your database.
💡 I will be making reference to the clerk docs but I will also add some extra steps.
1. Enable webhooks
To enable webhooks, go to the Webhooks page in the Clerk dashboard and click on the Add Endpoint button.
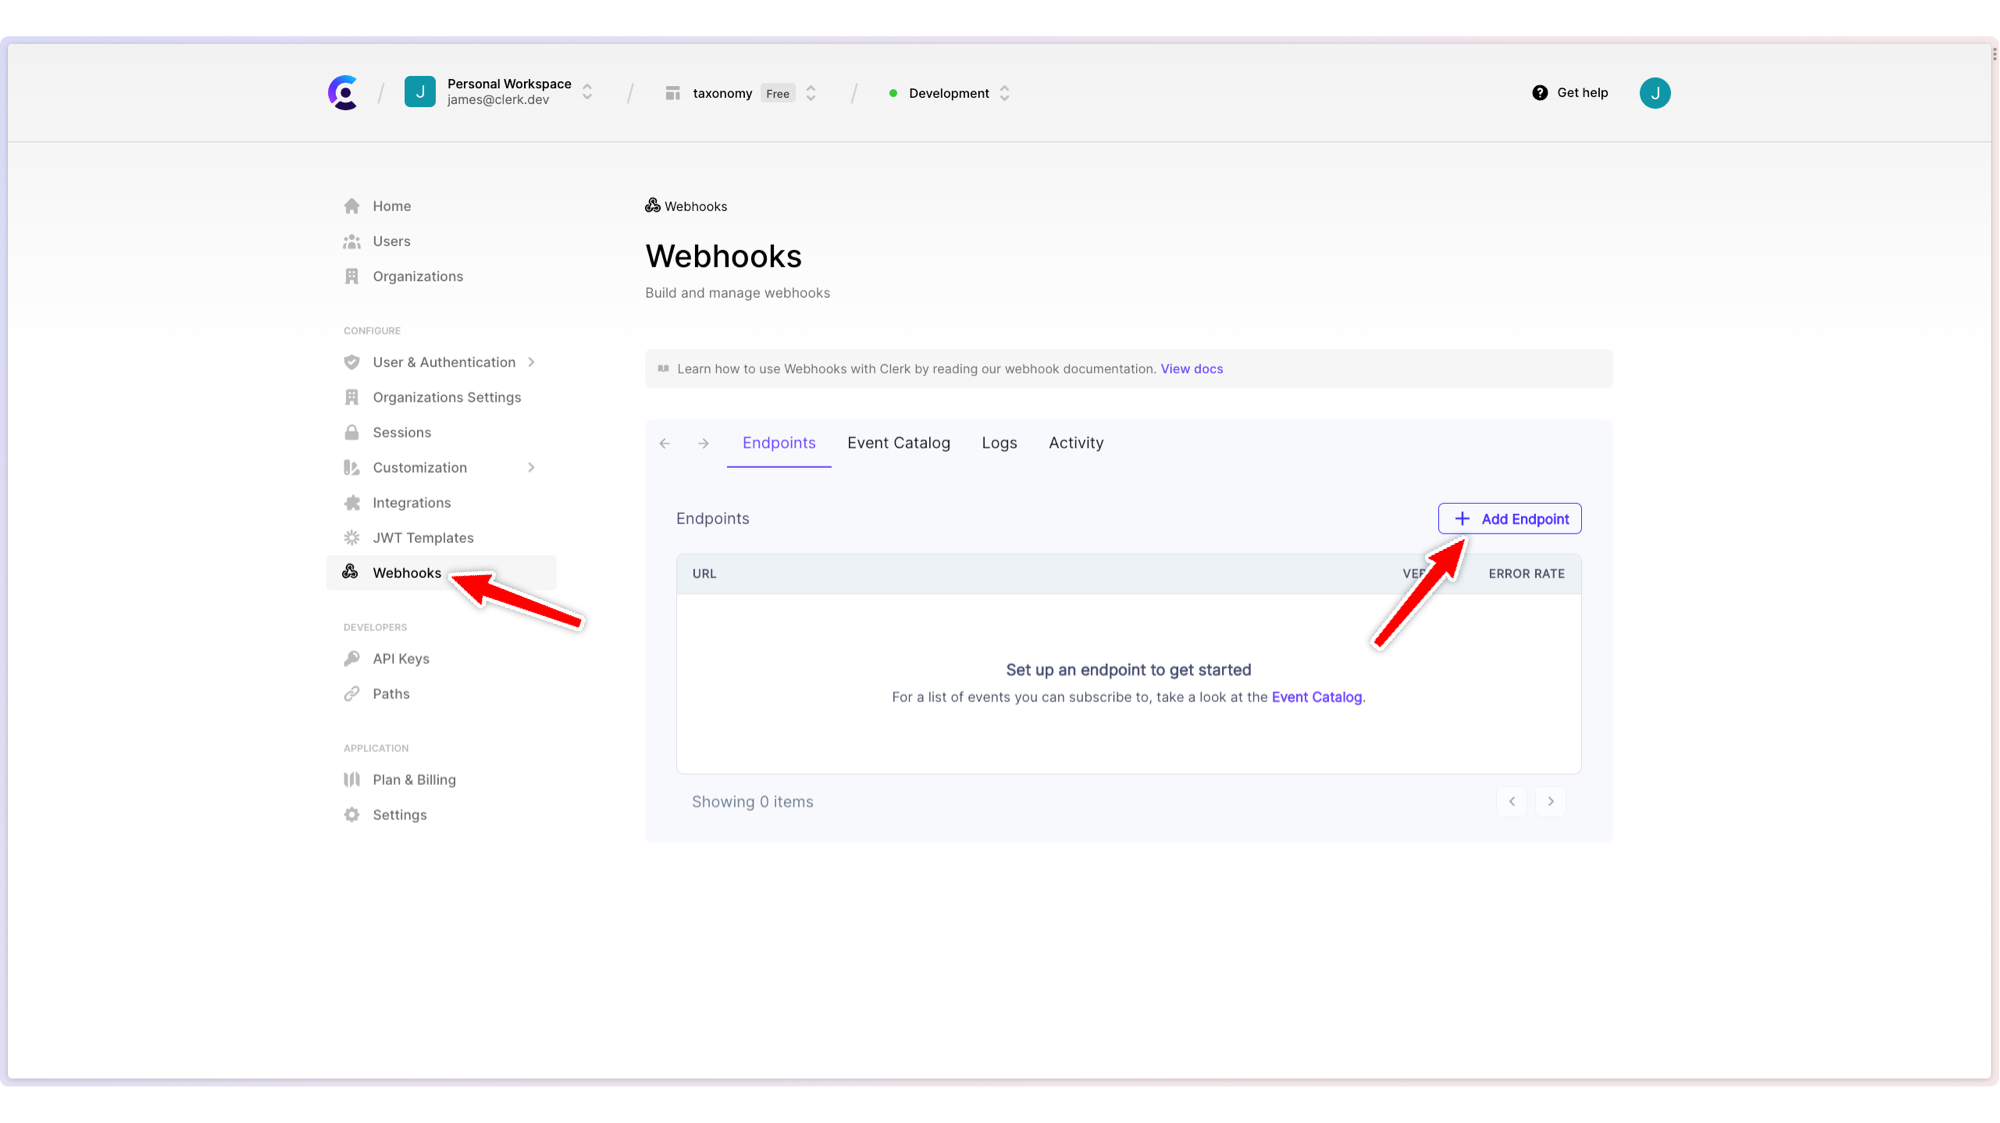
You'll be presented with a form where you can specify the URL of your backend endpoint. This is the URL where Clerk will send the webhook events.
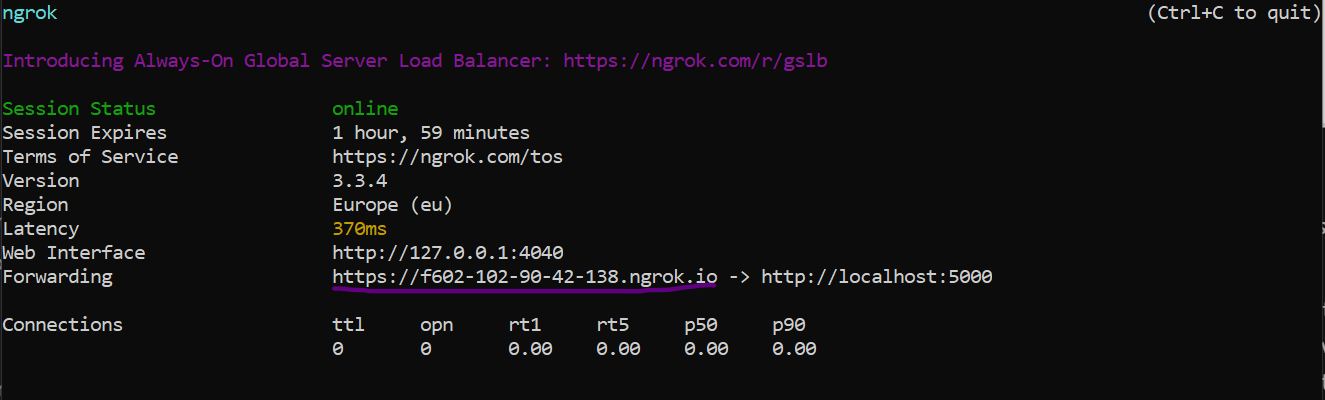
A small consideration here is that your URL must be hosted on a server to function properly, especially in the production stage. However, for local testing purposes, you'll need to expose your local server to the internet. One tool that can assist you with this is ngrok. You can download it here.
After downloading ngrok and done the installation, open your command prompt and enter the following command: ngrok http 5000 (or use the port of your choice). This will establish a connection, and you will receive a link that you need to copy and use as your URL 👇🏽
So now your endpoint should look like this 👇🏽

💡 Do not worry too much about the api/webhook you are seeing as its purpose will become clear in just a moment.
You can also specify the events you want to receive. For example, if you only want to receive events related to users, you can select the user option.
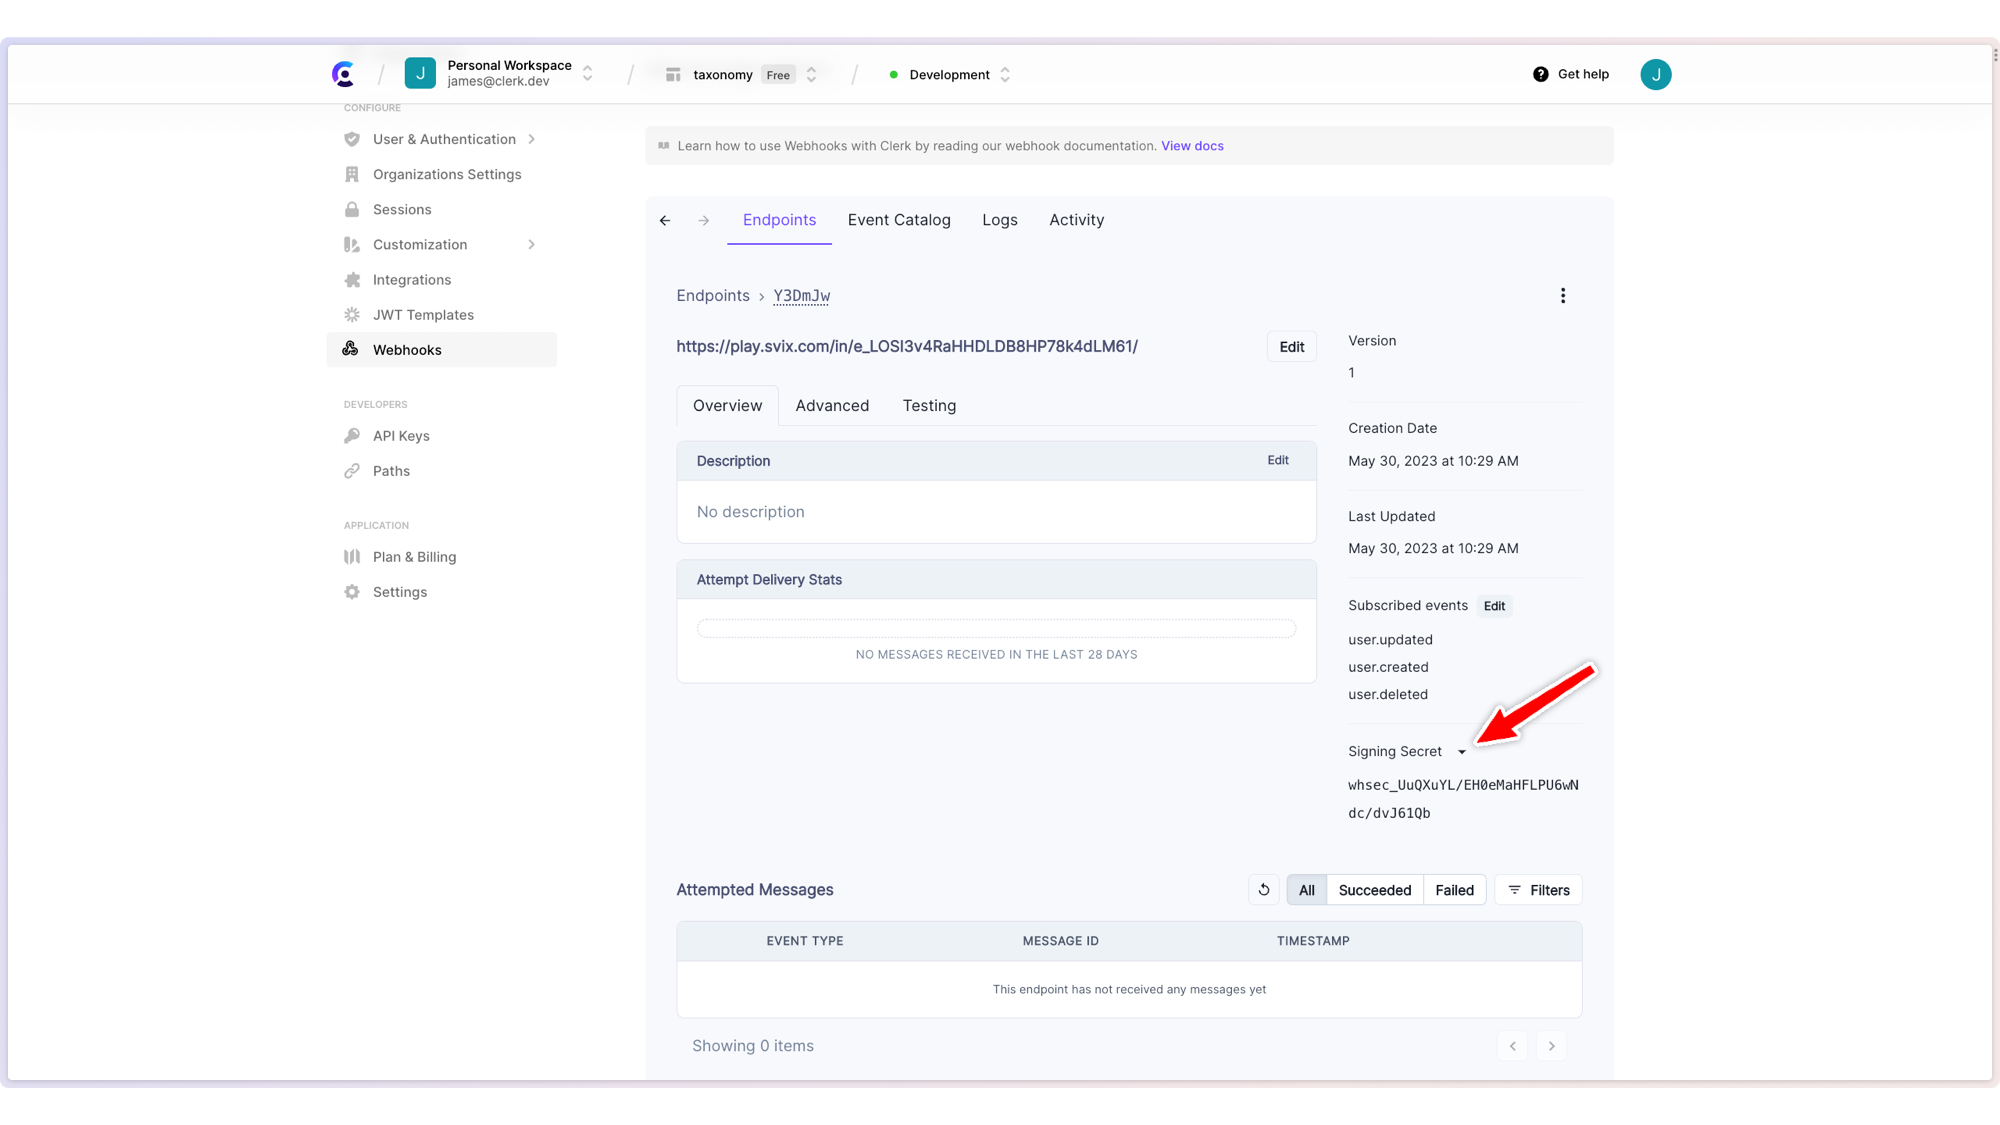
Once you click the Create button, you'll be presented with your webhook endpoint dashboard. Here you can see the URL of your endpoint and the events you selected and also your Signing Secret key which we are going to use for the backend code.
2. Setup your backend endpoint
Now that you have your webhook endpoint set up, you need to set up your backend endpoint(*api/webhook)* to receive the events. The Clerk webhook events are sent as HTTP POST requests with a JSON body. The body of the request contains the event type and the data related to the event.
Since we are using node(Express) to setup our backend, Here are the things you have to do.
Open your code editor
Create a server.js file ( you can give it any name)
Open the command line on your editor and install these packages 👇🏽
npm i express cors dotenv nodemon
After installing these packages, go to your package.json file and simply replace the npm start command with nodemon server.js then run npm start on your terminal.
Also set the type to module if you want to use the import syntax instead of the require
Now, let’s setup up our backend point using node(express)
You will have to install Svix. Svix provides a package for verifying the webhook signature, making it easy to verify the authenticity of the webhook events.
npm install svixNext you will want to retrieve the Webhook signing secret from the Clerk Dashboard. You can find this in the Webhooks section on the Clerk Dashboard. You will need to set this as an environment variable(.env file) in your Node project.
Now we are going to keep it simple as possible by using only the server.js file to write all our code but it is usually not good practice to do so. Here is the code that we are going to use 👇🏽
  import express from 'express';
  import dotenv from 'dotenv';
  import cors from 'cors';
  import { Webhook } from 'svix';
  import bodyParser from 'body-parser';

  dotenv.config();

  const app = express();

  app.use(cors());

  // Real code
  app.post(
    '/api/webhook',
    bodyParser.raw({ type: 'application/json' }),
    async function (req, res) {
      try {
        const payloadString = req.body.toString();
        const svixHeaders = req.headers;

        const wh = new Webhook(process.env.CLERK_WEBHOOK_SECRET_KEY);
        const evt = wh.verify(payloadString, svixHeaders);
        const { id, ...attributes } = evt.data;
        // Handle the webhooks
        const eventType = evt.type;
        if (eventType === 'user.created') {
          console.log(`User ${id} was ${eventType}`);
                  console.log(attributes)
        }
        res.status(200).json({
          success: true,
          message: 'Webhook received',
        });
      } catch (err) {
        res.status(400).json({
          success: false,
          message: err.message,
        });
      }
    }
  );

  const port = process.env.PORT || 5000;

  app.listen(port, () => {
    console.log(`Listening on port <http://localhost>:${port}`);
  });
Here's a step-by-step explanation of the code:
We Imported the dependencies we installed earlier,
Configuration:
dotenv.config(): Loads environment variables from a.envfile if one exists.
Creating an Express App:
const app = express();: Creates an instance of the Express application.
Middleware:
app.use(cors());: Enables Cross-Origin Resource Sharing, allowing the server to respond to requests from different origins.
Handling Webhook POST Requests:
app.post('/api/webhook', ...): Defines a route for handling POST requests to the '/api/webhook' endpoint.bodyParser.raw({ type: 'application/json' }): Middleware for parsing the request body as raw JSON data.
Request Handling Function:
The
async function (req, res) { ... }is the request handling function for the '/api/webhook' endpoint.Inside this function:
It attempts to process incoming webhooks.
It converts the request body (which should be in JSON format) to a string (
payloadString) and stores the request headers (svixHeaders).It creates an instance of the
Webhookclass using a secret key loaded from the environment variableCLERK_WEBHOOK_SECRET_KEY.It verifies the incoming webhook payload using the
verifymethod from theWebhookinstance. If the verification is successful, it extracts the event data and attributes.It checks the event type, and if it's 'user.created', it logs a message indicating that a user was created and logs the user attributes.
It responds with a JSON object indicating the success of receiving the webhook.
Error Handling:
- If an error occurs during the process (e.g., verification fails or an exception is thrown), it responds with a JSON object indicating the failure and the error message.
Server Port Configuration:
const port = process.env.PORT || 5000;: Configures the server to listen on the port specified in thePORTenvironment variable, or defaults to port 5000 if the variable is not set.
Server Start:
app.listen(port, () => { ... });: Starts the Express server to listen on the specified port.It logs a message indicating that the server is listening on the specified port (e.g.,
http://localhost:5000).
In a nutshell, we have simply set up an express server that listens for incoming webhook POST requests, processes the webhooks if they are valid, and logs information when a 'user.created' event is received. It also handles errors gracefully by sending an appropriate response.
Now, you can try signing up a user on your frontend and hopefully the user id, event type and attributes should be logged on your terminal.
Sync users details to Database
Next, we'll synchronize the data of the newly created user with our MongoDB.
As previously mentioned, a basic understanding of MongoDB and Mongoose is required as we'll be using these tools in this segment.
To get started, sign up for MongoDB, create a database, and create collection called 'users.' Afterward, copy the URL of your database and paste it into your environment file, where you stored your Clerk signing key and port number.
Next, we are going to connect to our database using mongoose 👇🏽
Install mongoose
npm i mongoose
    import mongoose from 'mongoose';

    // Connect mongoose to database
    mongoose
      .connect(process.env.MONGODB_URI)
      .then(() => {
        console.log('Connected to DB');
      })
      .catch((err) => console.log(err.message));

    const app = express();
Next, create a file called userModel.js to create a schema for the users we created and paste this code 👇🏽
    import mongoose from 'mongoose';

    const userSchema = new mongoose.Schema(
      {
        clerkUserId: { type: String, unique: true, required: true },
        firstName: String,
        lastName: String,
      },
      { timestamps: true }
    );

    const User = mongoose.model('User', userSchema);

    export default User;
This code above simply defines a Mongoose schema and model for a user with fields like clerkUserId, firstName, and lastName, allowing interactions with a MongoDB 'users' collection while automatically tracking creation and update timestamps.
Next, we have to create a User in our database when we make post request to our endpoint. Here is how to do it 👇🏽
    if (eventType === 'user.created') {
            console.log(`User ${id} was ${eventType}`);

            const firstName = attributes.first_name;
            const lastName = attributes.last_name;

            const user = new User({
              clerkUserId: id,
              firstName: firstName,
              lastName: lastName,
            });

            await user.save();
            console.log('User saved to database');
          }
If the event type is 'user.created', this code logs a message indicating that a user with a specific ID was created. It then extracts the user's first name and last name from the webhook attributes, creates a new user object with these details, and saves it to a database using Mongoose, logging a confirmation message once the user is successfully saved.
💡 Import the User model file and add .js at the end of the file to avoid getting errors.
Here is the code in full 👇🏽
    import express from 'express';
    import mongoose from 'mongoose';
    import dotenv from 'dotenv';
    import cors from 'cors';
    import { Webhook } from 'svix';
    import bodyParser from 'body-parser';
    import User from './userModel.js';

    dotenv.config();

    // Connect mongoose to database
    mongoose
      .connect(process.env.MONGODB_URI)
      .then(() => {
        console.log('Connected to DB');
      })
      .catch((err) => console.log(err.message));

    const app = express();

    app.use(cors());

    // Real code
    app.post(
      '/api/webhook',
      bodyParser.raw({ type: 'application/json' }),
      async function (req, res) {
        try {
          const payloadString = req.body.toString();
          const svixHeaders = req.headers;

          const wh = new Webhook(process.env.CLERK_WEBHOOK_SECRET_KEY);
          const evt = wh.verify(payloadString, svixHeaders);
          const { id, ...attributes } = evt.data;
          // Handle the webhooks
          const eventType = evt.type;
          if (eventType === 'user.created') {
            console.log(`User ${id} was ${eventType}`);

            const firstName = attributes.first_name;
            const lastName = attributes.last_name;

            const user = new User({
              clerkUserId: id,
              firstName: firstName,
              lastName: lastName,
            });

            await user.save();
            console.log('User saved to database');
          }
          res.status(200).json({
            success: true,
            message: 'Webhook received',
          });
        } catch (err) {
          res.status(400).json({
            success: false,
            message: err.message,
          });
        }
      }
    );

    const port = process.env.PORT || 5000;

    app.listen(port, () => {
      console.log(`Listening on port <http://localhost>:${port}`);
    });
You can try signing up a user again from your frontend and the user data defined in the user model should show on your database
Conclusion
That’s all guys, and congrats for getting to the end of the article 🎉. Let me know if you had issues with any part of the code on my the comment section. Till next time.


