

Hey there my friends 👋🏼
In this article, We will be creating a popup image modal using HTML, CSS, and VANILLA JAVASCRIPT. The whole concept of doing this is that when a user visits your website and clicks on an image in the image gallery, a larger version of that image should be opened in a modal. This is commonly seen in lightbox galleries and every other image gallery out there.
SO LET’S GET STARTED 😀
HTML CODE 👇🏾
For the HTML markup, we will be creating a parent div with a class of container to house the other elements. After that, we will also create another div with a class of gallery because we are going to be using CSS grid to place the images side by side evenly. After that, we will then create an img tag with three attributes inside it.
The first attribute will be the src which means we will be getting the image directly from the designated folder.
The second attribute will be the alt which simply means the alt text that will be shown if the image is not available for any reason.
The last attribute that will be created inside the img tag will be the data attribute and what the data attribute does is that it stores information that doesn't have any visual representation. But in this article, we will be giving the data attribute a name of original so that we can store the full original images inside it. PS I created eight(8) images but you can use as many or as few images as you want.
After that will we also create another div with a class of modal-container outside the class of gallery but there will be no content inside it and it is going to pop up when you click on any image.
And inside the modal-container class, we will create an img tag with a class of full-img and a p tag with a class of caption. The class of full-img will show the original image while the caption class will show the alt text that will be created earlier. But we will not add any contents inside them yet because will be adding the contents dynamically with JavaScript.
Here is the code for more clarity 👇🏾
<!DOCTYPE html>
<html lang="en">
<head>
<meta charset="UTF-8" />
<meta http-equiv="X-UA-Compatible" content="IE=edge" />
<meta name="viewport" content="width=device-width, initial-scale=1.0" />
<link rel="stylesheet" href="./css/style.css" />
<title>Image pop up modal</title>
<script defer src="./script.js"></script>
</head>
<body>
<div class="container">
<div class="gallery">
<img
src="./img/gallery-1-preview.jpg"
alt="The swimming section"
data-original="./img/gallery-1-full.jpg"
/>
<img
src="./img/gallery-2-preview.jpg"
alt="The dining section"
data-original="./img/gallery-2-full.jpg"
/>
<img
src="./img/gallery-3-preview.jpg"
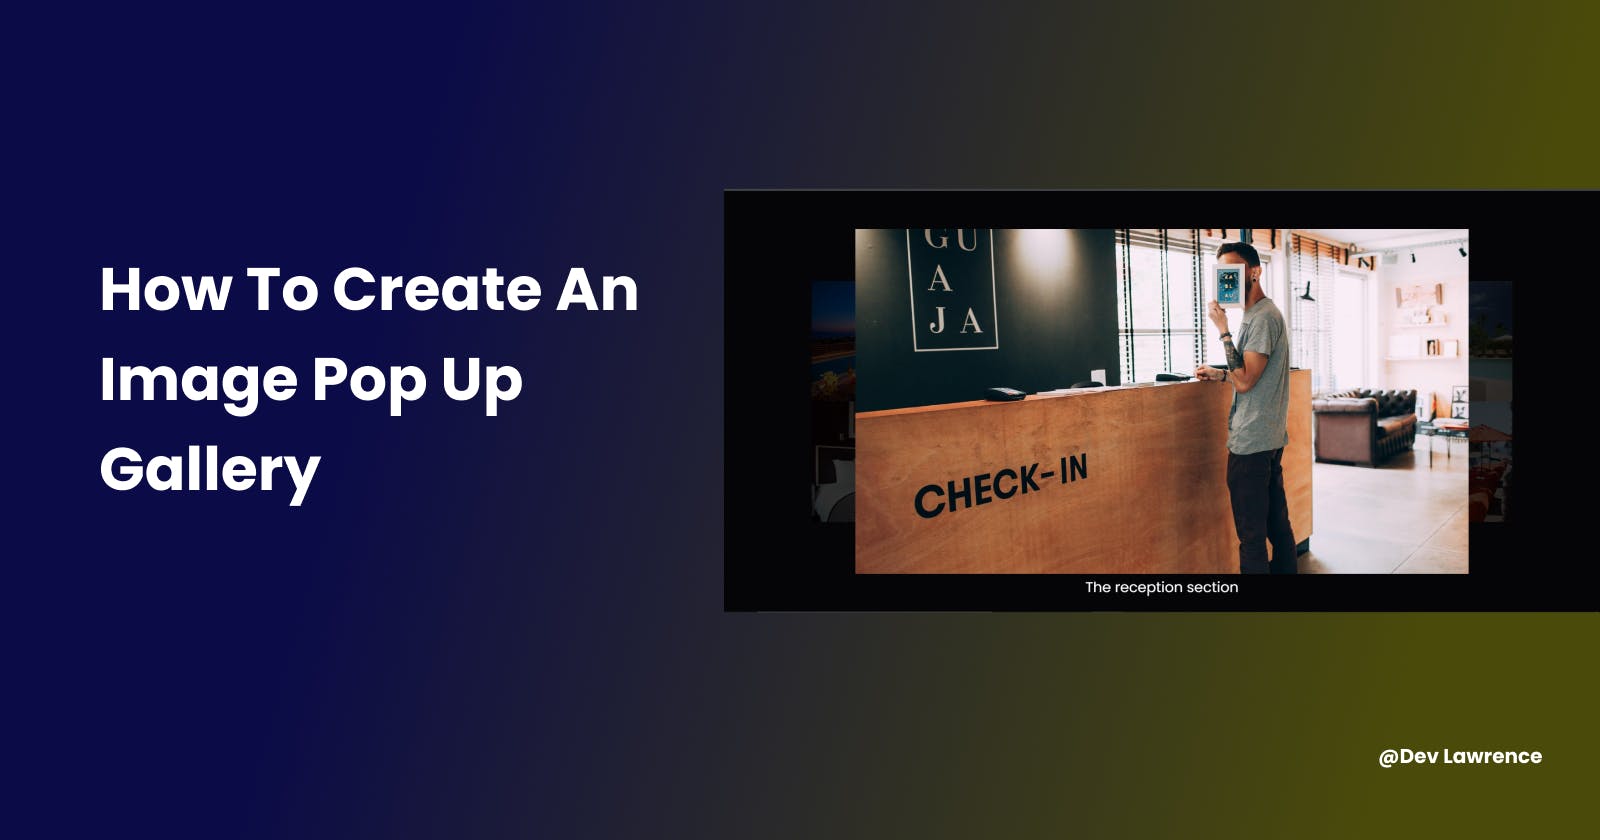
alt="The reception section"
data-original="./img/gallery-3-full.jpg"
/>
<img
src="./img/gallery-4-preview.jpg"
alt="The swimming section"
data-original="./img/gallery-4-full.jpg"
/>
<img
src="./img/gallery-5-preview.jpg"
alt="Bedroom section"
data-original="./img/gallery-5-full.jpg"
/>
<img
src="./img/gallery-6-preview.jpg"
alt="The lobby section"
data-original="./img/gallery-6-full.jpg"
/>
<img
src="./img/gallery-7-preview.jpg"
alt="Water walkway section"
data-original="./img/gallery-7-full.jpg"
/>
<img
src="./img/gallery-8-preview.jpg"
alt="The swimming section"
data-original="./img/gallery-8-full.jpg"
/>
</div>
<!-- zoom class -->
<div id="modal" class="modal-container">
<img src="" class="full-img" alt="" />
<p class="caption"></p>
</div>
</div>
</body>
</html>
CSS CODE 👇🏾
For the CSS code, we are using flexbox on our body container to center everything both vertically and horizontally. Next, we give a max width to the container class. Next, we are using CSS grid to create a grid of images that has 4 columns and 2 rows. Next, we will also add some styles to the modal-container class and append a class of show to it which will we add in the JavaScript later. After that, we will also add some styles to the caption class and finally, we will be adding some styles to the full-img class and also append a class of open to it which will we also add later in the JavaScript.
Here is the code for more clarity 👇🏾
@import url('https://fonts.googleapis.com/css2?family=Poppins:wght@400;500;700&display=swap');
* {
  margin: 0;
  padding: 0;
  box-sizing: border-box;
}

body {
  height: 100vh;
  font-family: 'Poppins', sans-serif;
  display: flex;
  align-items: center;
  justify-content: center;
  color: #fff;
  background: #191a24;
}

img {
  width: 100%;
  cursor: zoom-in;
}

.container {
  max-width: 80%;
  margin-inline: auto;
}

.container .gallery {
  display: grid;
  grid-template-columns: repeat(4, 1fr);
}

.modal-container {
  background-color: rgba(0, 0, 0, 0.8);
  position: fixed;
  top: 0;
  left: 0;
  width: 100vw;
  height: 100%;
  color: #fff;
  z-index: 1000;
  cursor: zoom-out;
  opacity: 0;
  pointer-events: none;
  display: flex;
  align-items: center;
  justify-content: center;
  transition: all 0.3s ease-in;
}

.modal-container .caption {
  color: #fff;
  font-size: 1.3rem;
  position: absolute;
  bottom: 3%;
  left: 50%;
  transform: translate(-50%, -7%);
}

.modal-container.show {
  pointer-events: all;
  opacity: 1;
}

.full-img {
  position: absolute;
  width: 70%;
  top: 50%;
  left: 50%;
  transform: translate(-50%, -50%) scale(0.5);
  transition: transform 0.3s ease-out;
}

.full-img.open {
  transform: translate(-50%, -50%) scale(1);
}
JAVASCRIPT CODE 👇🏾
This is where the fun part is because we are going to be adding interactivity and functionality to the Images in the DOM(Document Object Model). And we will be breaking it down into different segments.
First segment
In this segment, we will be getting some elements from the DOM and storing them inside different variables and the elements we are getting are modal Id, all the images inside the gallery container, the class of full-img, and the class of caption.
Here is the code for more clarity 👇🏾
// Get the elements from the DOM
const modal = document.querySelector('#modal');
const preview = document.querySelectorAll('.gallery img');
const original = document.querySelector('.full-img');
const caption = document.querySelector('.caption');
Second segment
In this second segment, we are looping around the preview images using the forEach() method and also adding an event listener which will listen for a click event. and also has a callback function so that when will click on an image, few things are going to happen in the DOM
- First, we will add the class of show that we created in the CSS to the modal variable.
- Then, we will add the class of open that we created in the CSS to the original variable.
- We will also create a variable called originalSrc and inside the variable, we will then get the data attribute that we created in our HTML
- After that, we will then change the source of the original to the originalSrc so that whatever image we are clicking on, we are going to get the image data.
- We will also repeat a similar process for the alt text too.
Here is the code for more clarity 👇🏾
// Loop around all the preview images
preview.forEach((preview) => {
  // add an eventlistener to each image
  preview.addEventListener('click', () => {
    // add the class of show to the modal
    modal.classList.add('show');
    // add the class of open to the original
    original.classList.add('open');
    // Dynamically change text and image
    const originalSrc = preview.getAttribute('data-original');
    original.src = originalSrc;
    const altText = preview.alt;
    caption.textContent = altText;
  });
});
Third segment
This is the last segment and it is not that complicated. What we are doing in this segment is that once we click on any part of the screen apart from the image and the text, then the image and text should disappear. Here are the ways to do that 👇🏾
- First, we are going to add an event listener to the modal to listen for a click and also add an event (e) to it too.
- Next, we are going to check what we are clicking on, that was why we added the e because anytime we click, an event is triggered and we want to target the modal-container.
- Next, we are going to add an if statement to check whatever we are clicking on, and if it has a classlist that contains modal-container then we are just going to remove the modal and the original.
Here is the code for more clarity 👇🏾
// add click event to the modal
modal.addEventListener('click', (e) => {
  // target the class that has the class of modal-container
  if (e.target.classList.contains('modal-container')) {
    modal.classList.remove('show');
    original.classList.remove('open');
  }
});
Here is the JS code in full 👇🏾
const modal = document.querySelector('#modal');
const preview = document.querySelectorAll('.gallery img');
const original = document.querySelector('.full-img');
const caption = document.querySelector('.caption');

// Loop around all the preview images
preview.forEach((preview) => {
  // add an eventlistener to each image
  preview.addEventListener('click', () => {
    // add the class of show to the modal
    modal.classList.add('show');
    // add the class of open to the original
    original.classList.add('open');
    // Dynamically change text and image
    const originalSrc = preview.getAttribute('data-original');
    original.src = originalSrc;
    const altText = preview.alt;
    caption.textContent = altText;
  });
});

// add click event to the modal
modal.addEventListener('click', (e) => {
  // target the class that has the class of modal-container
  if (e.target.classList.contains('modal-container')) {
    modal.classList.remove('show');
    original.classList.remove('open');
  }
});
Here is also a link to the source code on GitHub if you want to play around with the code. Image modal pop up
CONCLUSION
That’s all guys 😀, I hope you learned a few things from this article.
Always remember that the only way to be good at anything is by constant practice.