From Scratch to App: Building an Advice Generator with HTML, CSS, and JavaScript
How to build an Advice generator app


😀 Introduction
Hey Guys, I recently came across an Advice Generator App that I developed and shared on my GitHub a few months ago. After gaining more knowledge and skills in JavaScript, I decided to improve the app code-wise. I thought it would be a great opportunity to teach you how I built it. After all, we can all benefit from a little motivation and guidance to overcome life's challenges. 😅
In this tutorial, we will take a step-by-step approach to understanding each part of the code and how it contributes to the functionality and visual appeal of the app. So, let's get started and dive right into it! 😉
PS: I got the design from Frontend Mentor
🧰 Prerequisites
Basic knowledge of HTML and CSS.
Fundamental knowledge of JavaScript (I will still explain everything).
🏚️ HTML Structure
We will first examine the code before explaining its purpose to understand the HTML structure. 👇🏽
<body>
  <section class="container">
    <div class="advice-container">
      <div class="advice-title">
        advice #<span class="advice-id"> 117</span>
      </div>

      <div class="advice-content">
        <h3 class="advice-text">
          “Give up your seat for someone who needs it.”
        </h3>
      </div>

      <div class="pattern-divider"></div>

      <button class="btn" id="btn">
        <img src="./images/icon-dice.svg" alt="icon" />
      </button>
    </div>
  </section>

  <script src="./app.js"></script>
</body>
</html>
The HTML code provided above demonstrates the structure of the page.
The <body> section contains a single <section> element with a class of container. Inside the section, there is a <div> element with a class of advice-container. This div represents the main container for the advice generator app.
Inside the advice-container div, we have the following elements:
<div class="advice-title">: This div displays the title of the advice section. It contains the text "advice #" followed by a<span>element with a class ofadvice-idto display the advice ID dynamically.<div class="advice-content">: This div holds the actual advice content. It contains an<h3>heading element with a class ofadvice-textthat displays the advice text.<div class="pattern-divider">: This div represents a decorative pattern divider. It will be styled using CSS to display a pattern image.<button class="btn" id="btn">: This button element is the advice generation button. It has a class ofbtnand an id ofbtn. It contains an<img>element that displays an icon (icon-dice.svg) and provides a visual representation for the button.
💡 The reason why I gave a class of btn and an id of btn to the button is simply because we are going to be styling using the class to style the button and we are going use the id to access the button when we are writing our JavaScript code.
Finally, we include the JavaScript code for the app using the <script> tag. The src attribute points to the "app.js" file, which contains the necessary JavaScript code for fetching and displaying advice.
So far this is what we have in our browser 👇🏽
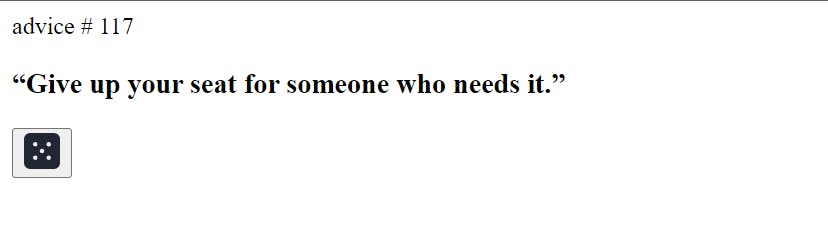
Come on. it isn’t as bad as it looks right? 😅. Let’s give it some styling.
🏡 CSS Styling
Next, let's explore the CSS code that styles our Advice Generator App. We start with a global reset using the asterisk selector to remove all the default margins, paddings, and set the box-sizing property to border-box.
Inside the :root selector, we define some custom CSS variables for colors and font families. These variables will be used throughout the CSS code to maintain consistency and allow easy customization.
The body selector sets the font-family to 'Manrope', a sans-serif font, and sets the background color to a neutral shade.
The .container selector centers the content both horizontally and vertically within the viewport using flexbox properties. It also sets the text alignment to center and adds some padding to the left and right edges.
The .advice-container selector defines the background color, width, border radius, and padding for the advice container.
The .advice-title selector styles the advice number by setting the color to an accent shade, applying uppercase text transformation, adjusting letter spacing, and setting the font weight and size.
The .advice-text selector styles the generated advice text by setting the color to another accent shade, adjusting the font size, and adding some padding to the left and right edges.
The .pattern-divider selector sets the background image to a decorative pattern divider, adjusts its dimensions and positioning, and sets different background images for different screen sizes using media queries.
The .btn selector styles the advice generation button by removing the default button styling, setting the background color to an accent shade, adjusting its dimensions and position, and adding a transition effect on hover.
Lastly, the .error-container selector styles the error message container, defining its background color, text color, padding, border radius, width, and position. It is initially hidden and only displayed when there is an error fetching advice.
Here is the code for more clarity 👇🏽
@import url('https://fonts.googleapis.com/css2?family=Manrope:wght@400;600;700;800&display=swap');

* {
  margin: 0;
  padding: 0;
  box-sizing: border-box;
}

:root {
  --pry-font: 'Manrope', sans-serif;
  --clr-accent-400: hsl(150, 100%, 66%);
  --clr-accent-350: hsl(193, 38%, 86%);

  --clr-neutral-400: hsl(217, 19%, 38%);
  --clr-neutral-350: hsl(217, 19%, 24%);
  --clr-neutral-300: hsl(218, 23%, 16%);
}

img {
  display: block;
  width: 100%;
}

body {
  font-family: var(--pry-font);
  line-height: 1.3;
  background-color: var(--clr-neutral-300);
}

.container {
  display: flex;
  justify-content: center;
  align-items: center;
  height: 100vh;
  text-align: center;
  width: 100%;
  padding: 0 1rem;
}

.advice-container {
  background-color: var(--clr-neutral-350);
  width: 450px;
  border-radius: 0.4rem;
  padding: 2.5rem 0;
}

.advice-title {
  color: var(--clr-accent-400);
  text-transform: uppercase;
  letter-spacing: 2px;
  font-weight: 600;
  font-size: 0.9rem;
  margin-bottom: 1rem;
}

.advice-text {
  color: var(--clr-accent-350);
  font-size: 1.5rem;
  padding: 0 1rem;
}

.pattern-divider {
  background-image: url(./images/pattern-divider-mobile.svg);
  width: 300px;
  aspect-ratio: 1/0.1;
  background-repeat: no-repeat;
  background-position: center center;
  background-size: contain;
  margin: 0 auto;
  position: relative;
  top: 2rem;
}

@media (min-width: 1200px) {
  .pattern-divider {
    background-image: url(./images/pattern-divider-desktop.svg);
  }
}

.btn img {
  width: 20px;
  height: 20px;
  margin: 0 auto;
}

.btn {
  border: none;
  outline: none;
  background-color: transparent;
  background-color: var(--clr-accent-400);
  height: 50px;
  width: 50px;
  display: inline-block;
  border-radius: 50%;
  cursor: pointer;
  position: relative;
  top: 4rem;
  transition: box-shadow 0.2s ease-in;
}

.btn:hover {
  box-shadow: 0 0 15px var(--clr-accent-400);
  filter: blur(-8px);
}

.error-container {
  background-color: #f8d7da;
  color: #721c24;
  padding: 10px;
  border-radius: 4px;
  width: 80%;
  text-align: center;
  position: absolute;
  top: 1rem;
  left: 50%;
  transform: translateX(-50%);
}
Here is the output of the HTML and CSS code👇🏽
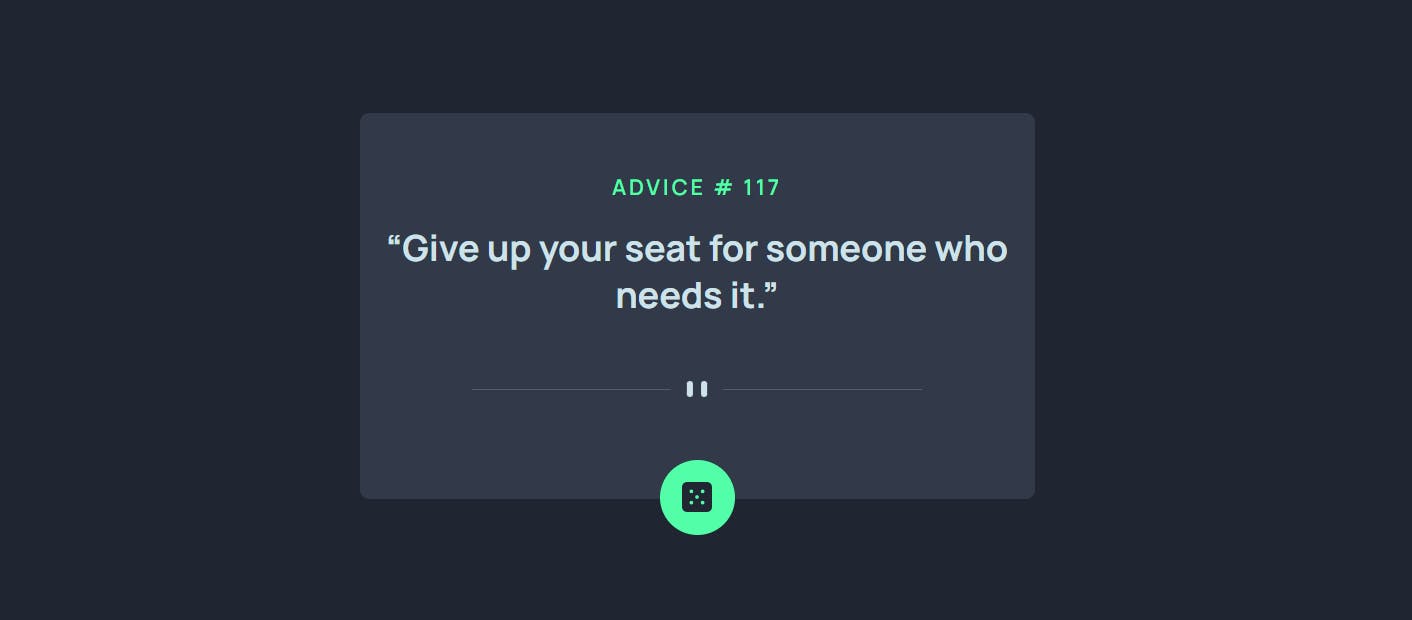
It looks a lot better now. All thanks to CSS 😅. Now let’s add some functionality to it.
🏗️ JavaScript Code
This is the fun part of this article. But we are going to break down the code segment by segment, explaining each line's purpose and functionality.
Segment 1
const button = document.querySelector('#btn');
const adviceId = document.querySelector('.advice-id');
const adviceOutput = document.querySelector('.advice-content');
const body = document.querySelector('body');
From the code above, we use the document.querySelector() method to select specific elements from the HTML document and store them in variables for easy access later.
The first line selects the button element with the id
btnand stores it in thebuttonvariable.The second line selects the element with the class **
advice-id**and stores it in theadviceIdvariable.The third line selects the element with the class
advice-contentand stores it in theadviceOutputvariable.The fourth line selects the
bodyelement of the document and stores it in thebodyvariable.
Segment 2
const showAdvice = async () => {
  try {
    const response = await fetch('https://api.adviceslip.com/advice');

    if (!response.ok) {
      throw new Error('Failed to fetch advice');
    }

    const data = await response.json();
    const adviceSlip = data.slip;
    const { id, advice } = adviceSlip;
    adviceId.innerHTML = `<span class="advice-id">${id}</span>`;
    adviceOutput.innerHTML = `<h3 class="advice-text">“${advice}”</h3>`;
  } catch (error) {
    const errorContainer = document.createElement('div');
    errorContainer.classList.add('error-container');
    errorContainer.innerHTML =
      '<p class="error-message">Failed to fetch advice. Please try again later.</p>';
    body.appendChild(errorContainer);

    setTimeout(() => {
      errorContainer.classList.remove('error-container');
    }, 3000);
  }
};
Yea, I know the code looks bulky and not easy for some of us to grasp at first glance. But do not worry, I got you covered 😉
From the code above, we define an async function called showAdvice, which will be triggered when the advice generation button is clicked. Here is a little explanation about async function if you’ve never used it or heard about it. 👇🏽
💡 Basically in JavaScript, the async keyword is used to define an asynchronous function. An asynchronous function is a function that operates asynchronously, meaning it can pause its execution at certain points and resume later without blocking the execution of other code.
Moving on 👇🏽
Inside the function, we use the
fetch()function to send a GET request to the specified API endpoint (https://api.adviceslip.com/advice) and retrieve advice data. Thefetch()function is a built-in browser API for making HTTP requests. It returns a Promise that resolves to the Response object representing the response to the request. You can learn more aboutfetch()here.We then check the response's status using the
okproperty. If the response is not successful (status code outside the range of 200-299), we throw an error using thethrowkeyword and theErrorconstructor. This error will be caught by thecatchblock.If the response is successful, we parse the response data as JSON using the
response.json()method. The returned data is an object containing the advice slip details.We extract the
adviceSlipobject from the data and destructure its properties (idandadvice) into separate variables.Next, we update the HTML elements to display the newly generated advice. We set the
innerHTMLof theadviceIdelement to include the advice ID using template literals and theadviceOutputelement to display the advice itself in an<h3>heading element.In case of an error, we handle it in the
catchblock. We create a new<div>element callederrorContainerand assign it the classerror-containerand we’ve already styled it on our CSS file. Inside the container, we set theinnerHTMLto display an error message.The
errorContainerelement is then appended as a child to thebodyelement using theappendChild()method.We also use the
setTimeout()function to remove the error container after a timeout of 3 seconds. This is achieved by removing theerror-containerclass from the element, effectively hiding it.
Segment 3
button.addEventListener('click', showAdvice);
For the last segment, The code above adds an event listener to the advice generation button (button). It listens for a click event and executes the showAdvice function when the button is clicked. This way, when the user clicks the button, the function is triggered, and a new random advice is fetched and displayed.
I hope you now understand how the HTML, CSS, and JavaScript files are working together.
Here is the JavaScript code in full 👇🏽
const button = document.querySelector('#btn');
const adviceId = document.querySelector('.advice-id');
const adviceOutput = document.querySelector('.advice-content');
const body = document.querySelector('body');

const showAdvice = async () => {
  try {
    const response = await fetch('https://api.adviceslip.com/advice');

    if (!response.ok) {
      throw new Error('Failed to fetch advice');
    }

    const data = await response.json();
    const adviceSlip = data.slip;
    const { id, advice } = adviceSlip;
    adviceId.innerHTML = `<span class="advice-id">${id}</span>`;
    adviceOutput.innerHTML = `<h3 class="advice-text">“${advice}”</h3>`;
  } catch (error) {
    const errorContainer = document.createElement('div');
    errorContainer.classList.add('error-container');
    errorContainer.innerHTML =
      '<p class="error-message">Failed to fetch advice. Please try again later.</p>';
    body.appendChild(errorContainer);

    setTimeout(() => {
      errorContainer.classList.remove('error-container');
    }, 3000);
  }
};

button.addEventListener('click', showAdvice);
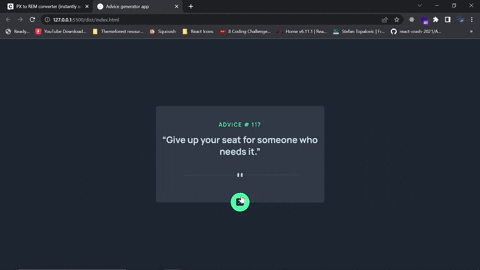
Here is the output of the code so far 👇🏽
You can also get this project from this Github repo.
Conclusion
Congratulations! 🎉 You have successfully learned how to build an Advice Generator App using HTML, CSS, and JavaScript. Feel free to customize the styles and enhance the functionality of the app according to your preferences. I have also written some articles on some of the things we used in the project such as JSON and Array Destructuring. Till next week guys🙂